Wednesday, August 29, 2012

Tutorial for a Fabric Book

 
Have you ever wondered how to make a fabric book the most complicated, yet also most lovely, way possible? Are you looking for something awesome to do with your coveted Heather Ross prints that have storybook text and sweet pictures? Are you pregnant and compulsively channeling your nesting instincts into making baby items?

Then you have come to the right place!

I had another great weekend with my mom visiting. Two heads are certainly better than one, especially when one of them is hers. We brainstormed a couple different ideas for a fabric book, and finally came up with a method that seems to work beautifully. I truly couldn't have done this without a creative, sew smart thought partner (and, let's be real, someone to do the pressing, cutting, and pinning when pregnancy demanded I sit down for a while).

I'm happy to share our process with you here.

Disclaimer: This is the first tutorial I've written, so if something is confusing, please comment or message me. I am happy to try and clarify a step. We really did make this up on our own, without referencing any online patterns or tutorials; it's totally possible someone else has independently discovered something similar.

More disclaimer: The pictures aren't that great. My camera is having focusing issues.

How to Make a Fabric Book

1. Cut out the pages. Page 1 - 11x11". Page 2 - 11x10 3/4". Page 3 - 11x11". (You can cut them any size; this is what we used. Just make sure to cut the middle page(s) a quarter inch smaller in width than the 1st and last pages.) I used one print in 3 different colors from Heather Ross's Far Fay Away III, fussy cutting each one to showcase a different scene.


2. Cut out the cover - 11 1/4 x 11". Again, if you are making different size pages, the cover should be the same height as the pages, and a 1/4" wider than the 1st and last pages. I chose a natural linen for the cover.

3. Cut out the batting - 11 1/4 x 11", same size as the cover fabric. I picked Quilter's Dream Green - it's made from recycled bottles and the perfect loft to use in small projects.

4. Press each page in half length-wise so you have a nice sharp crease.


5. Place pages 1 and 2 right sides together, with page 2 on top. Line up the EDGES, not the pressed fold. Sew on the right-hand side from the fold of page 2 out to the edge, all the way down the side, and back to the fold along the bottom. Clip the corners.


6. Fold back half of page 1. Place page 3 right sides together with page 2.


You'll get a little tri-cornered tent looking thing. Sew from the fold, all along the edge, to the other fold. It's okay if you have a little gap (not bigger than a 1/4") between the folds, since you will be top stitching later. Clip the corners. (To add more pages, just keep repeating this step.)


7. Turn the pages right side out and press. Yay! The inside of the book is done!


8. Where all the pages meet, the 1st and 3rd pages have a little quarter inch fold, from where you sewed the pages together. Clip both the 1st and 3rd pages vertically a quarter of a inch. This will allow you to easily sew the cover to the pages.


9. Make a little sandwich with your pages (right side up), book cover (right side down), and batting. It's helpful to fold the pages in so they don't accidentally get caught in the seam.


10. Pin and sew all the way around, leaving about a 3" opening on the bottom right side. Clip the corners.


11. Turn the whole thing right side out, and press. Wow! You're amazing! You've almost made a book!


12. Now the fun part - pretty it up. I chose to do all of the top stitching by hand with linen thread, but you could easily do it by machine. First, make a nice line down the middle. I looped around the top and bottom where all the pages meet, for extra security.


13. Top stitch about 1/8" away from the edge around the cover pages. Be sure to seal up the 3" opening where you turned the book right side out.


14. Make a title placard. Cut out a piece of your cover fabric and use a darning foot to free-motion "write" the title. (This took A LOT of practice before I had a decent result.) Next cut out a scrap of contrasting fabric to frame the title. Stitched them together, leaving the edges raw. I used perle cotton thread. Then carefully hand-stitch the whole placard to the cover while avoiding going all the way through the quilt sandwich. I also added a little squirrel. He was too cute!


I also found this little apple in the selvedge and tacked it onto the back cover. :o)


15. Yay, you made an awesome book! Celebrate by finding a little friend to share it with!

Snow White
"She awoke in the woods, with new friends to greet her."
"Snow White found the cottage full of charm and laundry."
"They were a merry band of brothers, without a mother to mind them..."
The End!

As for my other works-in-progress:
1. Ball - Both halves are complete and sewn together, just need to stuff with fluff and close.
2. Gobbi mobile - Waiting on some perle cotton to arrive in the mail.
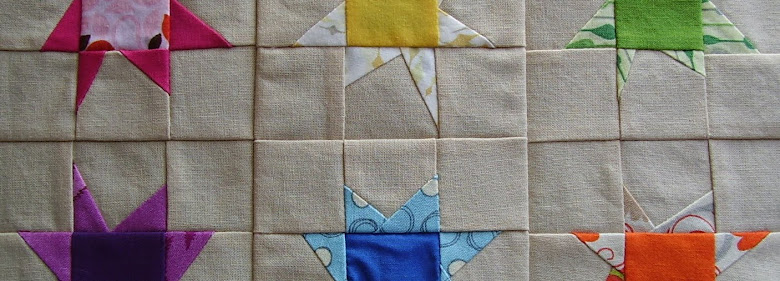
3. 2nd Baby Quilt - Yes, it's back! I couldn't bear the thought of having only one quilt to welcome both my sons. With mom's help, I picked out lovely complementary fabrics that I already had on hand, and chose a very simple 9-patch pattern. It's pieced and in the process of being quilted.


And the most important WIPs? The babies are still both head down, and growing rapidly. Last week, Baby A was about 5 lbs, 2 oz, and Baby B was about 4 lbs, 12 oz. We all seem to be doing well. In only 5 more days, I will have carried them for 36 weeks, and they are officially approved for birth! (Twins born at 36 weeks are considered full term.) My OB says it could be any day...but I hope they don't decide to make an appearance for another couple of weeks. Yeep!!

More WIPs here:


Wednesday, August 22, 2012

Graduation Quilt

The second great accomplishment of the summer!


My brother graduated from high school this past June and I am so happy to finally give him the gift he wanted: a quilt in his school colors.


I started this queen-sized quilt last June. I knew I wanted a scrappy, strip block, but the layout went through many incarnations before I settled on these giant criss-cross blocks. I never get tired of them - this is one of my favorite blocks. And I love them even more when they are HUGE.


These long-suffering gentleman were so patient with the wind, and all my directions to hold this corner higher, etc. Thanks to Mr Awesome (hand at top left!) and our kind neighbor for their quilt holding services! They're going to start to run the other way when they see me coming.

I pieced the backing "blind," putting together any and all scraps I had on hand without looking at the final layout until it was done. Then I folded the backing over the top in a self-binding method.


Mr Awesome acquired this piece of fabric during a trip to the Pacific Islands years ago. (Little did he know he was picking up material for his quilt-obsessed future wife!) It was the perfect thing to complete the backing.


Cool stuff like this happened spontaneously.


My amazing long-arm quilter friend, Kristin, designed and executed the quilting. As with Mumu, I gave her totally free reign, and the final result is as lovely to look at as it is to feel that quilty texture. I love how she chose a Polynesian-inspired pattern.


Top and bottom border

All wrapped up and ready to go off to college...here's hoping it survives :o)


In baby sewing progress...
I've been way more tired lately (as in, take a shower, then lie down to recover from over-exertion), so I'm logging a lot of couch time. This is not always awesome for my sanity, but it's been really good for the little ball on my to-do list. Thank God for hand-sewing. I'm surprised at how quickly it's coming together.

Sorry, no pic. There was about an hour of sun today and I was too tired to find the camera.

I'm striving to be very zen about quieting my inner self so I can channel my limited energy where it is most needed, but some days are much harder than others. I like to be doing things, making plans, crossing items off lists. As my ability to do stuff diminishes, I get more controlling about the tasks I can do. This is why I haven't started the cloth book yet. In my mind, a 6-page book meant to be chewed on has morphed into a visual-tactile encyclopedia for infants. I want it to be PERFECT, to have text pages and picture pages and textural pages, and to be just the right colors, and and and.

A working title: As I Lay Planning, by Your Mother, Crazypants.

Back in real life, the clock is ticking on this pregnancy, so I'm going to finish the book by next week. At 34 weeks, both babies are head down again (yay!) and everything is looking good. The docs tell me they can safely be born at any time (what the what?!) - I'm hoping for at least 4 more weeks though.

Other projects I haven't started yet:
1. Gobbi mobile (this is super quick, no sewing involved)

I've let go of the idea of making another quilt/play mat. Nesting aside, I have to know my limits. I'm a little sad about it, but it is possible to sew once you have kids, right? Right??

Enjoy more stories about progress at Lee's:

Wednesday, August 15, 2012

Sunshine and Moonbeam

My BEST FRIEND in the WHOLE WORLD had a birthday in July, so naturally I put a little something together for her two weeks late. Now that she's received her giftie, I can share it with you, too.


When we were kids, my friend's dad nick-named our inseparable duo "Sunshine and Moonbeam." She was super outgoing, with a shiny mane of blonde hair; I was bookish, in dark braids. This wonderful woman has certainly brought a lot of light, fun, and love into my life. I picked out one of my improv blocks to make into a wall-hanging for her. I hope she likes it!


Ever since trying it out on the receiving blankets, I'm all over these rounded corners. I just use a dinner plate to cut around. The puzzle here was number of spokes quilted out of the little O. I was going for texture, but didn't want to over-do. I like the final result. This quilt finished at about 26x30". I added a hanging sleeve in the back in case she wants to put it up on a wall.


And another finish this week! All this progress is so unlike me!


I made this improv block a while ago, but recently quilted it to hang in the nursery.


In trying to step out of my comfort zone, I did some non-linear free-motion quilting. I drew the clouds on first with a water-soluble fabric pen (love those) and did my best to stay on track with the needle. I committed to not ripping out any stitches - "que sew-ra, sera," and all that. I also branched out by using colored thread.


Whenever improv quilting, the hardest part is knowing when it's done. For example, I love the texture of The Silly Boodilly's quilts. Nearly every inch of the fabric is covered in stitches. They appear layered; there is a depth and weight to them (they beg to be touched), yet I never feel that the piecing is "covered." What makes her quilting and piecing are so harmonious?


I didn't use a paper piecing method for either of these wall-hangings. Instead, I practiced my favorite method of sewing first and cutting later. I find cutting out paper, having to rip it off later, and even working with an outcome in mind are unnecessary for me and make the process less enjoyable. Of course, the downside is doing more math as I go.


Progress on Projects for the Babies:
1. Wall-hanging Finished! I'm so glad to hang this up in my little guys' room.
2. Ball - I finally started sewing some of the pieces together! Yay!


Not Started:
3. Books

New Schemes:
4. Gobbi Mobile
5. Montessori fabric balls (2)


The babies will be here in 3-7 weeks. Approximately. Yikes!! Baby B (the one on top) is perfecting his gymnastics skills by flipping every which way. While Baby A remains head down, B has turned breech - which means he has now been caught in every possible configuration. Transverse, oblique, vertex, breech...this guy can't make up his mind.


My latest panic (besides the stretch marks...oh, the many stretch marks...) is that I only made one play mat for the babies to share, and now it's not working in the space we had planned for it. I know we don't need two of EVERYTHING, but...only one quilt? I might need to whip up another tout suite - but how different should they be? Do I have time for all this??

Thanks for visiting, quilt friends! See more progress at Lee's: